
Nearest Location Nearest Location National Call Center (800) 858-1701

Does Water Damage Cause Mold? What You Need to Know!

A particularly persistent problem in damp, humid,  or rainy regions, mold can emerge from seemingly nowhere. However, any mold you find in your home or business has likely been growing for quite some time—just out of sight.

But what about homes and businesses in arid, dry, or desert locations that have experienced water damage? Can water damage cause mold?

The short answer is yes. Read on to learn how water damage leads to mold, what signs to look for, and when to call in the pros.

How Water Damage Can Quickly Lead to Mold Growth

Tiny, invisible mold spores naturally exist everywhere. When they encounter wet surfaces, they start growing. That’s why water intrusion provides a perfect environment for mold and often requires professional water damage restoration to fully dry and stabilize affected materials.

If the wet surface is an organic material (e.g., wood) or a porous material (e.g., drywall), mold growth can become especially quick and pervasive.

Generally speaking, mold spores begin growing within 24 to 48 hours. That window of time is recognized and referenced by industry guidance as a key benchmark for mold detection and response.

Types of Water Damage That Commonly Cause Mold

Three types of water damage can create optimal conditions for mold:

  • Clean water – Generally referring to tap water or rainwater, sources include plumbing failures, appliance leaks, and minor roof leaks. This is also referred to as Category 1 water. 
  • Grey water – This consists of water used for basic cleaning or nonpotable purposes, such as from sump pump failures, washing machine drainage, or contaminated moisture sources. This type of water damage is categorized as Category 2.

Black water – Also known as ‘Category 3’ water, black water is contaminated with human or animal waste and could be harmful or toxic. Presenting the greatest risk of rapid-spreading mold, sources include sewage backups and floodwater. Even though rain rainwater starts as Category 1 it quickly becomes Category 3 once it hits the ground or enters a building, picking up contaminants like debris, sewage, chemicals, and bacteria. 

Hidden Moisture That Homeowners Often Miss

Perhaps the most frustrating problem with mold is how difficult it is to detect early growth or the moisture that causes it—at least with the human eye. Moisture can become trapped behind drywall, within insulation, under flooring, or inside wall cavities, allowing for unmonitored spreading. 

Mold-enabling moisture can also come from humidity, condensation, or poor ventilation, regardless of whether visible water remains or not.

Early Signs of Mold After Water Damage

After water damage, it’s crucial to monitor for early signs of mold, including: 

  • Musty odors lingering in affected rooms, especially enclosed spaces
  • Discoloration, spotting, or water stains emerging from behind walls, ceilings, or trim
  • Peeling paint, warping wood (e.g., floors, door jambs), or soft, spongy drywall
  • Allergies, coughing, or respiratory irritation persisting or worsening
  • Increased indoor humidity or condensation (e.g., on windows or on bathroom surfaces)

When Mold Becomes a Serious Problem

So, water issues and damage can cause interior mold growth. But if the same mold keeps coming back regularly, a moisture source (and larger issue) is likely responsible. This can be especially troubling when porous materials are involved, as the mold growth becomes pervasive and persistent. 

More than just a surface-level issue, unchecked mold growth can cause structural deterioration and serious health concerns.

Mold Returning After DIY Cleaning

If the mold keeps returning no matter what you do, call in a certified, expert mold technician. There’s likely an underlying moisture source or another issue that they can identify using dedicated detection tools.

Mold Growth Larger Than 10 Square Feet

According to the Environmental Protection Agency (EPA), mold growth that’s less than 10 sq. ft. can generally be handled on your own. Once the growth exceeds that size, however, there’s likely extensive water damage, hidden moisture, contamination, or deeper structural issues to deal with. 

At this point, the EPA recommends calling in a professional.

Mold Appearing After Flooding or Major Water Intrusion

As a ‘Category 3’ type of water, floodwater introduces contaminants that speed up mold growth and can make it more harmful to live around.

Even after professionals remediate and restore the contaminated area, continued monitoring is important. This is because mold spores are invisible, and even after the mold colony dies, spores can remain present inside walls, flooring, and similar spaces.

Mold Causing Strong Odors or Structural Warning Signs

Musty odors and soft, deteriorating building materials often indicate a significant mold problem. Check for structural ‘red flags’ like soft drywall, rotting wood, sagging flooring, or staining under paint or wallpaper. If building materials seem ‘spongier’ than they should be, mold and moisture are probably the reason.

Mold Found in HVAC Systems

If you suspect mold might be growing within your HVAC system, the spores produced will circulate through your ducts and vents, following the air current. This type of spreading makes it very difficult to locate and contain all the activated spores. It’s even tougher to locate and eliminate the original source, making professional help crucial.

What Happens If You Ignore Mold After Water Damage

While no one wants to go through the hassle of addressing a mold problem, ignoring it will only make the situation worse:

  • The speed at which mold spreads makes cleanup exponentially more difficult and costly over time.
  • Individuals living or working around the mold could develop respiratory symptoms, allergies, or irritation—a legal concern for employers or property managers.
  • Delaying remediation may cause your insurance provider to deny your claims.

Preventing Mold 

To prevent or reduce the likelihood of mold issues after water damage, follow these steps:

  • Dry the area quickly and thoroughly – Towels and fans can help rid moisture, but there’s no comparison to professional-grade dehumidifiers and drying equipment. If possible, verify moisture levels, as you won’t be able to determine dryness with just your eyes.
  • Address the source of the moisture – Sometimes leaks, drainage problems, roof issues, and plumbing failures are easy to identify. When they’re hidden and cultivating mold, it’s far more difficult to actually resolve the problem. If mold keeps returning to the same place, you need to track down and fix the source.
  • Improve ventilation and humidity control – Promote airflow throughout basements, bathrooms, attics, and crawl spaces with fans or dehumidifiers. Per EPA guidance on mold, indoor humidity should ideally range from 30% to 50%, and never exceed 60%.
  • Inspect regularly after heavy rain or leaks – Periodically check for new stains, odors, moisture spots, and mold growth. Any issues you can spot and remediate immediately will help prevent larger, costlier problems later on.

When to Call a Professional Mold Remediation Company

Any time you’re concerned that a mold job might be too much or too hazardous to handle, call in for professional mold remediation services. Without the specialized tools and training of certified technicians, most homeowners and property managers have difficulty properly testing for moisture, identifying mold, containing its spread, and completing a thorough remediation that helps prevent future outbreaks.

Other indicators that you want to call a professional include:

  • Mold growth covering more than 10 sq. ft.
  • Mold emerging after a flood with ‘Category 3’ water
  • Mold that keeps returning no matter what you do
  • Strong, musty odors seem to linger in certain rooms or locations
  • Health symptoms—particularly respiratory—seem to grow worse indoors

Without the experience or tools of certified technicians, the average homeowner or property manager will struggle to adequately test moisture, inspect for mold, contain the growing colony, and fully remediate the mold while preventing future outbreaks. 

On the Frontier of Mold Remediation

So, does water damage cause mold? 

Yes. It’s one of the main culprits.

Water damage—whether minor or pervasive—rapidly leads to mold spores activating and growing in the span of just one or two days. Early action, including drying, inspecting, and calling in the pros as needed, remains the best strategy to fully remediate mold. You’ll protect your home or business’s integrity, people’s health, and your wallet.

To learn more about mold remediation—or to tackle a persistent problem you just can’t seem to solve on your own—contact Frontier Services Group. Our certified technicians provide immediate, 24/7 assistance and expert mold remediation support.


Sources:

How Long Does Water Damage Restoration Take

How Long Does Water Damage Restoration Take?

When water invades your home or business, every hour feels like a lifetime. More than anything, you just want life to go back to normal—fast.

But how long does water damage restoration take?

The timeline depends on several factors: the amount and type of water, how quickly professionals arrive, the materials affected, and whether structural repairs are required. For minor incidents, the process may wrap up in just a few days. For severe damage, you could be looking at weeks of cleanup and rebuilding.

Knowing what to expect can help ease stress, so keep reading to learn everything you need to know about the process of water damage restoration.

Typical Timeframes for Water Damage Restoration

Every water damage situation is unique, but there are general timelines to expect.

  • For small, clean water incidents (like a burst pipe you catch quickly), restoration is often finished within two to five days. These cases are relatively straightforward, requiring only water extraction, a few days of drying, and minimal repairs.
  • When water seeps deeper into the walls or floors, it can take one to two weeks for crews to fully dry the affected areas. If the water has wicked up the walls or into flooring materials, those elements may need replacement rather than sanitation.
  • Severe damage is a different story. If your home or business has standing water, mold, or significant structural issues, you can expect to wait several weeks to a few months before everything returns to normal.

Keep in mind that these timelines cover the entire process: water removal, drying, cleaning, and repairs.

Factors That Influence Restoration Timelines

No two water damage situations are alike. Understanding the different factors that impact water damage restoration can help you go into the process with realistic expectations.

Type of Water Involved

The source of water greatly affects timelines.

  • Clean water (Category 1) – Minimal contamination means faster drying and simpler cleanup.
  • Gray water (Category 2) – Comes from appliances or sinks, requiring more cleaning and disinfection.
  • Black water (Category 3) – Sewage or floodwater demands the strictest safety protocols and decontamination.1

If Category 1 or 2 water is left standing for more than 48 hours or comes into contact with dirty surfaces, drywall, or insulation, it can be reclassified as Category 3 due to bacterial growth and contamination risk.

Extent and Severity of Damage

Ultimately, the larger the affected area, the longer the process will take.

Deep water saturation in walls or insulation slows progress. Hidden pockets of mold can also cause delays if they’re discovered during mid-restoration, which may require mold remediation services.

Materials Affected

Some materials dry quickly; others don’t. Carpet, drywall, and insulation are typically replaced or dried within days, while hardwood floors, subflooring, and structural framing take longer.

Drying Requirements

Temperature and humidity in the space influence how long drying takes.

Industrial fans, dehumidifiers, and other equipment accelerate the drying process, but even under ideal conditions, wood and other porous materials require time.2

Repair and Reconstruction Needs

If damage is minimal, repairs (like trim or drywall replacement) are often completed quickly. Severe cases involving electrical rewiring, structural rebuilds, or mold can stretch timelines by weeks or months.3

In short, water removal is only the beginning. The combination of all these factors determines whether you’re back to normal in days or facing a months-long project.

Steps in the Timeline

Water damage restoration follows a clear sequence. Here’s what to expect at each stage, along with actions you can take to speed things up.

Emergency Response (Hours)

Frontier’s team is available 24/7 to stop active leaks and begin extraction. Technicians will assess risk and stabilize the property as quickly as possible.

What to do: Turn off the main water supply (if safe). Only unplug electronics if the power is off or it’s safe to do so, as unplugging devices around standing water can be dangerous. Move valuables out of harm’s way before help arrives.

Water Removal (1–3 Days)

Crews pump out standing water and remove soaked materials, such as carpets or insulation. Drying equipment is set up immediately.

What to do: Stay clear of work areas. Document all damage for insurance.

Drying and Dehumidification (3–7 Days Longer)

Air movers, dehumidifiers, and moisture meters run continuously to pull moisture from the property.

What to do: Avoid turning off equipment, even at night. Keep windows and doors closed to maintain controlled conditions.

Cleaning and Sanitizing (1–3 Days)

All affected areas are disinfected and deodorized. Salvageable contents are cleaned either on-site or taken away.

What to do: Separate items you want restored from those you plan to discard to save time.

Repairs and Restoration (Varies Widely)

Once moisture levels are confirmed to be safe, repairs begin, ranging from drywall patches to major reconstruction.

What to do: Approve repair estimates quickly and select materials promptly.

How to Keep the Process Moving Faster

The following actions help crews work faster and can get you back to normal sooner.

  • Calling for professional help immediately – Moisture seeps deeper into walls and furniture every hour it’s left untreated. Acting quickly can shave days (or even weeks) off your restoration timeline. Always choose a licensed, insured restoration company with strong customer reviews to ensure safe and effective service.
  • Working with your insurance provider – Insurance approvals are one of the biggest bottlenecks in restoration. Document everything to make the claims process smoother, and keep communicating with your adjuster.
  • Choosing a company with in-house repair capabilities – Many restoration companies handle only cleanup, outsourcing reconstruction to subcontractors. By selecting a provider with both mitigation and repair teams under one roof, you cut out intermediaries, keeping everything on a single schedule.

Stop Water Damage in Its Tracks with Frontier Services Group

At Frontier, we’ve over a decade helping homeowners and business owners across Greater Houston recover from the unexpected. We’re your 24/7 emergency response team, ready to stop damage in its tracks and start recovery right away.

We know the stress that comes with water damage, and our goal is to make the process as smooth as possible. From the first emergency call to the final repairs, you’ll have a team of specialists working to get your life back to normal faster.

Water damage won’t wait, and neither should you. Contact us today to schedule immediate service or request a restoration plan tailored to your needs.


Sources:

  1. ResearchGate. Energy efficient water damage restoration by insulated wall drying panels. https://www.researchgate.net/publication/351554263_Energy_efficient_water_damage_restoration_by_insulated_wall_drying_panels
  2. United States Environmental Protection Agency. Moisture Control Guidance for Building Design, Construction and Maintenance. https://www.epa.gov/sites/default/files/2014-08/documents/moisture-control.pdf
  3. National Institutes of Health. Moisture and Mold Remediation Standard Operating Procedures. https://ors.od.nih.gov/sr/dohs/Documents/moisture-and-mold-remediation-sop.pdf
What is the Water Damage Restoration Process

What is the Water Damage Restoration Process?

Maybe a pipe burst, or a slow leak went unnoticed until it spread into the walls. Perhaps a storm sent water rushing into your home or business. No matter how it started, your property is now facing the effects of unwanted water.

What do you do about it?

Restoring a water-damaged property takes more than just removing standing water. It’s a full process that involves cleaning, drying, repairing, and ultimately returning your property to its pre-damage state.

If you don’t take the right steps, hidden moisture can linger, mold can spread, and the structural integrity of your home or business can be compromised. Here, acting fast can make all the difference.

Let’s break down each stage of water damage restoration services, so you understand what to expect from the moment help arrives until your space feels whole again.

Water Damage Restoration in Brief

A typical water damage restoration project moves through several key phases:

  • Inspection
  • Water removal
  • Drying
  • Cleaning
  • Repairs

Each step builds on the last, creating a thorough process for your property’s restoration. Skip a step, and the risks multiply — whether it’s:

  • Moisture that lingers behind walls
  • Mold that secretly spreads out of sight
  • Weakened materials that may give way and turn into bigger, more expensive problems later

The exact approach may also shift depending on the source and category of water involved. Consider: Clean water from a broken supply line poses different risks than contaminated water from a backed-up drain or flood.1

Professionals in the field know how to adapt. While the tools, techniques, and protections shift with the situation, the goal remains the same: to bring your property back to its pre-damage condition as efficiently and safely as possible.

Step 1 – Initial Inspection and Assessment

The first step in any restoration project is a careful inspection.

  • Before cleanup can begin, the source of water must be found—and if it’s still active, stopped right away. That might mean shutting off a supply line, capping a broken pipe, or addressing drainage issues outside the property.
  • Once the flow is under control, professionals use infrared technology to map out how far the water has traveled. What you see on the surface is often only part of the picture. Moisture can seep into drywall, flooring, insulation, and even structural framing, creating hidden pockets that can cause damage long after the visible water has dried up.2
  • Next, the water itself is classified as either clean water, gray water from appliances, or black water from sewage or flooding. This classification guides the level of safety precautions, protective gear, and cleaning methods that the team will need.
  • Finally, every detail is documented. Photos, moisture readings, and notes become part of the project plan and can also support insurance claims.

With a full assessment in place, the restoration team has a clear roadmap to move forward.

Step 2 – Water Extraction

Once the inspection is complete, the next priority is removing standing water. Time is critical here: The longer water sits, the more damage it causes. What appears to be a shallow puddle on the surface can quickly seep deeper into flooring, drywall, and furniture, multiplying the repair costs.

Restoration professionals use high-powered pumps, vacuums, and other specialized equipment to pull out water. These tools move far more volume, far more quickly, than anything available for home or business use.

In cases of heavy flooding, truck-mounted systems may be brought in.

Water extraction sets the stage for everything that follows. Without thorough removal at this stage, the drying process takes longer, hidden moisture has more time to spread, and the risk of mold growth rises dramatically.

By clearing out as much water as possible upfront, the restorers ensure that the next steps (drying and dehumidification) have a solid foundation to work from.

Step 3 – Drying and Dehumidification

After the bulk of the water is removed, the real battle of chasing down the invisible moisture begins. Standing water may be gone, but dampness lingers inside walls, under flooring, and deep inside building materials.

Now, industrial-grade air movers and dehumidifiers whir into action.

  • Air movers help dry surfaces
  • Dehumidifiers capture and remove moisture from the environment

Together, these tools create a comprehensive and controlled drying system that reaches places ordinary fans can’t.3

This process takes patience. Depending on the severity of the damage, drying may last several days, with technicians checking progress, adjusting equipment, and monitoring moisture levels along the way. They also pay special attention to areas that often trap moisture and cause problems long after the visible water has subsided, such as subfloors, cabinets, and wall cavities.

Step 4 – Cleaning and Sanitizing

Once the property is fully dried, the team proceeds to clean and sanitize the space. Apart from wet floors, water damage often leaves behind debris, stains, contaminants, and even odors that linger unless they’re properly treated.

Cleaning Debris

Clearing away debris and removing damaged materials that can’t be salvaged is a crucial step as it helps prevent the growth of mold and bacteria. Removed materials may include:

  • Warped drywall
  • Saturated carpet padding
  • Insulation that has absorbed water

With the unsalvageable materials gone, the remaining surfaces can be thoroughly treated.

Preventing Mold

Technicians will apply antimicrobial treatments to walls, floors, and other affected areas. These solutions kill bacteria and help prevent mold from taking hold in the future.

This step proactively ensures both the structure of your property and the health of the people inside it.

Restoration

Not everything damaged by water needs to be discarded. Many fabrics, furniture pieces, and personal belongings can be cleaned and restored with the right methods.

From specialized upholstery cleaning to deep washing of clothing or linens, water damage restoration teams aim to recover as much as possible.

Eliminating Odors

Finally, water damage often leaves behind an unpleasant musty odor that no amount of airing out can resolve. Professionals tackle this with deodorizing equipment and treatments, such as air scrubbers or fogging machines, that neutralize odors at their source.4

By the end of this step, your property is clean, sanitized, and safe. The stage is set for the final phase: repairs and full restoration.

Step 5 – Repairs and Restoration

Now, your restoration team focuses on putting everything back together.

  • Water damage often leaves behind weakened drywall or compromised ceilings. Such structural elements are usually replaced or rebuilt.
  • Once the structure is secure, technicians repair the flooring, patch and repaint the walls, reinstall the trim, and address the fixtures.

The goal is always to return the property to pre-loss condition or better. Sometimes this means matching finishes exactly. Other times, owners take the opportunity to update materials or finishes during the rebuild.

This final stage is the payoff of the entire process. After the stress of water damage, seeing your fully restored space will provide you with peace of mind.

Moving Forward After Water Damage With Frontier Services Group

When water first seeps into your home or business, it can feel like the situation is out of your control. The shock of seeing soaked floors or stained walls is real, but remember: There’s always a clear path forward. With the right processes and a reliable, expert team on your side, water damage doesn’t have to leave lasting scars on your property.

At Frontier Services Group, we’ve built our reputation on bringing homes and businesses back from the unexpected. You can count on our team to handle the heavy lifting, including:

  • Finding hidden moisture
  • Preventing mold before it starts
  • Cleaning furniture, fabrics, and keepsakes whenever possible
  • Coordinating specialized repairs
  • Making sure every detail is restored

At the end of the day, we’re focused on what matters most: Getting you safely back to a place that feels like yours again.

If your home or business has been affected by water damage, don’t wait. The faster you act, the more we can save. Contact us today.


Sources:

  1. Johns Hopkins. The Visible and Unseen Dangers Lurking in Floodwater. https://publichealth.jhu.edu/2024/the-dangers-of-floodwater
  2. ScienceDirect. A comprehensive plan to reduce losses from water damage at a university. https://www.sciencedirect.com/science/article/abs/pii/S1871553214000760
  3. ResearchGate. Energy efficient water damage restoration by insulated wall drying panels. https://www.researchgate.net/publication/351554263_Energy_efficient_water_damage_restoration_by_insulated_wall_drying_panels
  4. Northern Arizona University. Water Damage Restoration Guideline. https://in.nau.edu/wp-content/uploads/sites/226/2020/03/Water-Damage-Guideline.pdf

Common Reasons Fort Worth Homes Need Water Damage Cleanup

Common Reasons Fort Worth Homes Need Water Damage Cleanup

Water damage is one of the most common disasters that homeowners face. So what are the most common reasons for water damage? And how can you avoid them? In this post, our water damage cleanup experts at Frontier Services Group in Fort Worth will walk you through these most common reasons for water damage and provide some tips for preventing them.

Burst Or Leaking Pipes

Burst or leaking pipes are a perennial cause of water damage. Damage from failed pipes is a problem at all times of the year. Even small, slow leaks can cause significant damage over time if they go unnoticed. They could lead to mold growth, warped flooring, and compromised structural integrity. Make sure you frequently inspect exposed pipes and monitor your water bill for unexplained increases. This will help you prevent leaks or catch them in their tracks before the need for water damage cleanup becomes too severe.

Severe Weather

Fort Worth is no stranger to severe thunderstorms, hail, and flash floods, especially in spring and early summer. Heavy rains can overwhelm storm drains and cause water to seep into basements or low-lying areas of your home. If your home isn’t properly graded or lacks effective drainage, you’re at even higher risk. If you have adequate warning, emergency preventative measures like placing sandbags around your property can help limit damage if flooding is imminent. Preparing in advance for severe weather can also help you lower the cost of water damage cleanup by minimizing damage.

Leaky Roofs

Your roof should be your first line of defense against water damage disasters. Over time, however, your roof can become weakened and turn into a source of vulnerability. Missing shingles, damaged flashing, clogged gutters, or general wear and tear can all allow water to seep in during storms, leading to damage in your attic, ceilings, insulation, and walls. Regular roof inspections, especially after major weather events, can help you catch these issues early. Proactively maintaining your roof and addressing minor repairs right away is one of the best ways to prevent a major water damage cleanup project from a leaky roof.

Appliance Failures

There are a vast number of ways that issues with your appliances can cause water damage. Just to name a few, problems with your water heater, dishwasher, washing machine, refrigerator, and more are all potential sources of water damage. These appliances can fail quickly, without warning, and lead to large amounts of water in a relatively short time. Make sure you inspect your appliances regularly and read the user manuals to understand what needs to be done to keep your appliances from causing water damage in your home.

Water Damage Cleanup in Fort Worth

While adhering to the advice given above will undoubtedly go a long way toward reducing the risk of water damage in your home, nothing is ever guaranteed when it comes to water damage. If you are unfortunate enough to deal with a water damage disaster in your home, contact our water damage cleanup experts at Frontier Services Group in Fort Worth without delay. We will do all we can to help your home recover from the damage and walk you through the water damage cleanup process.

What Are the First Signs of Water Damage?

Identify tell-tale signs that indicate your property is suffering from water damage.

While most homeowners or business owners may not think about it often, water is a highly damaging substance – especially when left to sit for extended periods. When left alone, water can cause immense structural damage and mold growth, which can harm your property and make the people inside it sick. It’s essential to familiarize yourself with the first signs of water damage on your property so you can take immediate action to solve the problem before it gets any worse.

When water damage strikes, it can wreak havoc on your home or business. Be prepared by learning the first signs of water damage, understanding why you should get water damage restoration work done, learning how to remediate mold in your property, and seeing how Frontier Services Group can help you at every stage.

The First Signs of Water Damage

You may think you’d notice the early signs of water damage or mold growth, but unfortunately, most of us miss those first warning signals. To ensure that water doesn’t have time to cause damage and that a few mold spores don’t become an infestation, look out for these common signs:

  • Visible Wet Spots – Wet spots and stains can indicate recent water damage. If not resolved quickly, they can lead to mold growth and other structural issues.
  • A Sudden, Sharp Increase in Water Bills – A sudden spike in your water or sewage bill can mean one of your appliances is leaking. Look around your dishwasher, washing machine, or pipes for any pooling water. A small leak now can cause significant water damage later.
  • Bad Odors – Do you notice a musty smell in your home? A consistent musty or damp scent is a clear sign of water damage and mold growth.

Once you notice these first tell-tale signs of water damage, we encourage you to reach out to a Frontier Services Group professional immediately to address any issues like an emergency water pipe repair before the problem grows.

Water Clean-Up & Restoration

When water damages your home or business, know you don’t have to deal with it all on your own. Whether the water damage came from a leaking pipe, a fire, or a natural disaster, find a trusted water restoration company to remove standing water and restore your property to its original state as soon as you can.

At Frontier Services Group, we’ve handled water damage of all kinds. Our experienced professionals will respond quickly to any situations like an emergency water extraction. We’ll assess your property, identify the problem areas, and develop a comprehensive solution to removing the water and cleaning the damage. Without proper water damage restoration, your property could see harmful mold growth and costly structural issues. Avoid them by calling Frontier Services Group at the first sign of water damage.

Get Rid of the Harmful Mold

After just 48 hours of water damage, you can expect mold to begin growing on your property. And before you know it, your home or business could be fully infested with harmful fungi. From small leaks to major floods, mold will seize any chance to grow. Once you realize you have water damage on your property, you more than likely have a mold problem too.

Frontier Services Group cares about the health of your family and employees and the structural integrity of your property as much as you do. Don’t jeopardize your safety and the safety of the people you love by waiting to remove the mold on your property. Using our years of mold removal experience and professional equipment, we can successfully remedy your mold problem before serious health problems occur. Our professionals adhere to all Texas Department of Licensing and Regulation (TDLR) mandates when completing our mold removal services.

Once You Spot Signs of Water Damage or Mold, Call Us

For more than a decade, Frontier Services Group has been proudly providing Texas with complete water damage restoration and mold remediation work, and we would be glad to help you next. At the first sign of water damage, reach out to our team of experts for a resolution before the damage worsens or mold growth continues. Whether you’re a homeowner or business owner, keep our number handy for immediate water damage and mold relief.

How Can I Prevent Water Damage in My Fort Worth Home?

How Can I Prevent Water Damage in My Fort Worth Home?

If you’ve ever dealt with water damage, you know it’s no joke. One minute, your home is dry and cozy; the next, you’re standing ankle-deep in water, wondering how life took such a turn. And in Fort Worth, where storms, plumbing mishaps, and humidity are all too real, water damage can sneak up on you fast. The good news is you can prevent it. With a little maintenance and some good old-fashioned preparedness, you can keep your home safe and dry.

Simple Water Damage Prevention Tips

Let’s dive into some simple but crucial ways to prevent water damage in Fort Worth.

1. Quick Roof Repairs

Your roof is your first line of defense against water damage. A single missing shingle or cracked tile can turn into a full-blown leak during a Texas storm. Make it a habit to check your roof at least twice a year, once in the spring and once before storm season hits. If you see anything suspicious, like curling shingles or clogged gutters, call in the pros before a small issue becomes a disaster.

2. Clean Your Gutters

Sutters do more than just collect leaves. Their job is to channel rainwater away from your home. But when they’re clogged, that water overflows, seeping into your foundation and walls. Grab a ladder and clean your gutters out every few months, especially in the fall when leaves pile up fast.

3. Watch for Plumbing Leaks

Not all water damage comes from the sky. Sometimes, the biggest culprits are hiding inside your home. A slow-dripping pipe under your sink or behind your walls can cause mold, rot, and expensive repairs before you even notice. Check under sinks, around toilets, and near appliances like washing machines for any signs of leaks. If you see water spots on your ceiling or walls, don’t ignore them.

4. Know Where Your Water Main Is

Picture this: a pipe bursts and water starts gushing into your home. Do you know where your shut-off valve is? If not, now’s the time to find it. Shutting off the water quickly can prevent thousands of dollars in damage. Bonus tip: If you’re going on vacation, consider turning off your water main before you leave. Nothing ruins a trip like coming home to a flooded house.

5. Get a Sump Pump

If your home is prone to flooding, a sump pump is your best friend. It automatically pumps water out of your basement or crawl space before it has a chance to cause damage. But here’s the thing: it won’t do you any good if it’s not working. Test it regularly by pouring a bucket of water into the pit and making sure it turns on. Also, consider a backup battery in case the power goes out during a storm.

6. Protect Your Foundation

Your home’s foundation is like its backbone. When water seeps into it, cracks can form, leading to costly repairs. Make sure the ground around your home slopes away from the foundation so rainwater doesn’t pool. If you notice cracks, seal them up before they get worse.

7. Invest in a Water Leak Detector

Smart water leak detectors can alert you to leaks before they become a big problem. Place them near water heaters, washing machines, and under sinks. Some models even connect to your phone, so you get real-time alerts no matter where you are.

What If Water Damage Still Happens?

Even with all the precautions in the world, water damage can still strike. Whether it’s a surprise storm, a hidden leak, or a plumbing disaster, acting fast is key. That’s where professional water damage restoration services come in.

If you find yourself facing water damage in Fort Worth, don’t panic. We’ve got your back. Our expert team can handle everything from water extraction to drying, mold prevention, and full restoration. We’ll make sure your home is back to normal in no time.

Water Damage – Fort Worth

Preventing water damage isn’t just about avoiding inconvenience. It’s about protecting your home, your belongings, and your peace of mind. A little maintenance goes a long way, and staying proactive can save you thousands in repairs.

But if disaster does strike, remember: fast action makes all the difference. If you need water damage restoration in Texas, give us a call at Frontier. We’re here to help 24/7.

IICRC Certification: Absolutely Vital for Restoration Companies Featured Image

IICRC Certification: Absolutely Vital for Restoration Companies

The Institute of Inspection, Cleaning, and Restoration Certification (IICRC) is a certification and standard-setting non-profit organization for the inspection, cleaning, and restoration industries. With a board of directors comprised of 15 industry leaders elected by the IICRC shareholders, the IICRC functions in over twenty-five countries to protect the interests of both consumers and professionals.  When you hire an IICRC-certified company, you can count on a professional contractor committed to doing the job the right way the first time. 

Company Certification

A company that wishes to be IICRC certified must go through a rigorous application process and meet certain standards to ensure they’re both trustworthy and reliable.  A company with an IICRC certification is a company you can trust.

  1. Insurance

Certified companies are required to show proof of insurance, which protects both the customer and the company.Continuous coverage is required, and the company must provide documentation of this coverage when asked.

  1. Employee Training

Continuous training and support are required for all employees to gain and maintain their certifications, which ensures all member companies offer the best service possible.

  1. Code of Ethics

The IICRC has a strict set of codes set forth by which all members must abide.Called ANSI or IICRC standards, these codes set the standard of care for the entire industry.

  1. Customer Complaints

The IICRC is dedicated to customer support and satisfaction.Because of this, certified companies are required to have a well-maintained, written customer complaint policy that includes documented follow-up for all complaints.

Technician Certification

The IICRC offers certifications for individual technicians as well as companies.  Technicians are given industry-specific training that helps you, the customer, be confident that the people working in your home will maintain the utmost level of professionalism and care.

  1. Standardized Training

All credentials offered by the IICRC are equivalent no matter where the training takes place, so you can trust that your technician has met the highest standard in the industry.

  1. Continuous Learning

Continued education is required to maintain certifications.The restoration industry is continuously evolving, so it’s necessary to stay ahead with regular training.Some of the courses offered by the IICRC are:

  • Water Damage Restoration Technician (WRT)
  • Applied Structural Drying Technician (ASD)
  • Fire and Smoke Restoration Technician (FSRT)
  • Health and Safety Technician (HST)
  • Building Moisture Thermography (BMT)
  • Applied Microbial Remediation Technician (AMRT)
  • Commercial Drying Specialist (CDS)

IICRC certified companies are the preferred choice for insurance providers and property owners.When you choose and IICRC-certified company, you can rest easy knowing that both the company and its employees abide by rigorous standards and guidelines set in place to ensure the best care possible.

Understanding Structural Drying: Techniques for Efficient Water Removal Featured Image

Understanding Structural Drying: Techniques for Efficient Water Removal

Water damage is a common and potentially devastating issue faced by homeowners and property managers. When water infiltrates a structure, it poses a risk to its integrity and can lead to secondary problems such as mold growth and structural damage. Efficient water removal is crucial to prevent further harm and restore the affected space. In this blog post, we’ll delve into the principles of structural drying and explore techniques that professionals use to efficiently remove water and mitigate the impact of water damage.

The Importance of Swift Structural Drying

1. Preventing Mold Growth:

Mold can start to grow within 24 to 48 hours of water intrusion. Swift structural drying is essential to prevent mold spores from finding the moisture they need to thrive. Mold not only poses health risks but also requires additional remediation efforts once it takes hold.

2. Preserving Structural Integrity:

Water compromises the structural integrity of building materials. Wood, drywall, insulation, and other porous materials can weaken and deteriorate when exposed to prolonged moisture. Quick and efficient structural drying helps preserve the strength and stability of the affected structure.

3. Minimizing Secondary Damage:

Water damage can lead to secondary issues such as warped floors, stained ceilings, and damaged belongings. The longer water remains, the greater the likelihood of secondary damage. Efficient drying minimizes these effects, reducing the scope of repairs and associated costs.

4. Restoring Indoor Air Quality:

Stagnant water can create a breeding ground for bacteria and other contaminants. Effective structural drying not only removes water but also helps restore indoor air quality by eliminating the conditions conducive to microbial growth.

Principles of Structural Drying

1. Assessment of Damage:

Before initiating structural drying, professionals conduct a thorough assessment of the damage. This involves identifying the source of water intrusion, determining the affected areas, and assessing the extent of the damage. This information guides the development of a tailored drying plan.

2. Water Extraction:

The first step in structural drying is the removal of standing water. High-capacity pumps, wet vacuums, and other specialized equipment are used to extract water from various surfaces. The faster water is removed, the more effective the drying process will be.

3. Dehumidification:

After water extraction, dehumidification is a key step in structural drying. Dehumidifiers are deployed to remove excess moisture from the air and materials. This helps accelerate the drying process and prevents secondary issues like mold growth.
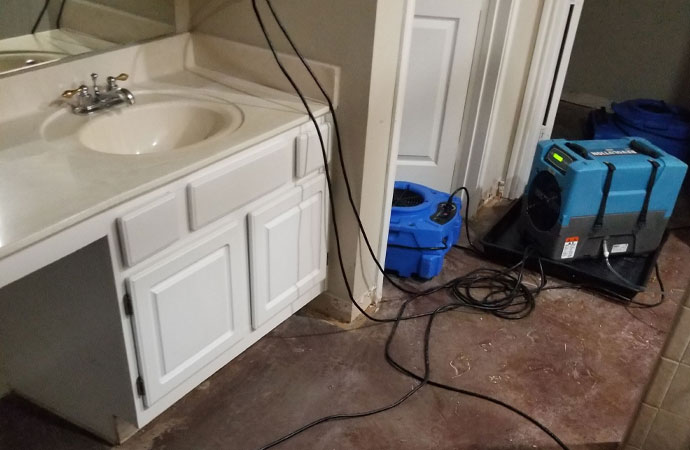
4. Air Circulation:

Promoting air circulation is crucial for efficient drying. Industrial-strength air movers are strategically placed to enhance the evaporation of moisture from surfaces. Proper air circulation ensures that damp air is continuously replaced with drier air.

5. Temperature Control:

Maintaining an optimal temperature accelerates the drying process. Warmer air can hold more moisture, facilitating its removal from materials. Professionals may use heaters to raise the temperature in the affected area, further expediting drying.

6. Monitoring and Adjusting:

Throughout the drying process, professionals use moisture meters and other monitoring tools to assess the progress. Adjustments to the drying plan are made based on real-time data, ensuring that the conditions remain optimal for efficient water removal.

Techniques for Efficient Structural Drying

1. Infrared Imaging:

Infrared imaging technology is used to identify hidden pockets of moisture within walls and other building materials. This non-invasive technique allows professionals to pinpoint areas that may require focused drying efforts.

2. Injectidry System:

The Injectidry system is a drying method that involves injecting air into wall cavities, ceiling spaces, and other enclosed areas. This technique is particularly effective for drying hard-to-reach spaces, minimizing the need for extensive demolition.

3. Desiccant Dehumidification:

Desiccant dehumidifiers are highly efficient at removing moisture from the air. They use a desiccant material to absorb moisture, making them effective in both low- and high-temperature conditions. Desiccant dehumidification is especially useful in large or challenging drying situations.

4. Drying Chambers:

Creating drying chambers can isolate affected areas, allowing for more controlled and targeted drying. Temporary barriers are set up, and specialized equipment is used to create an enclosed space, optimizing drying conditions.

5. Negative Air Pressure:

Negative air pressure is a technique used to prevent the spread of contaminants during the drying process. By creating a pressure differential, contaminated air is directed outside, maintaining a cleaner environment within the affected space.

6. Hydroxyl Generators:

Hydroxyl generators are advanced air purifiers that help eliminate odors, bacteria, and volatile organic compounds. These generators can be used during the drying process to improve indoor air quality and create a healthier environment.

Special Considerations for Different Materials

1. Wood:

Wood is highly susceptible to water damage, and drying it efficiently is crucial to prevent warping, swelling, and rot. Professionals use specialized drying techniques such as targeted air circulation, dehumidification, and moisture monitoring to preserve the integrity of wood materials.

2. Drywall:

Drywall is a porous material that can absorb water rapidly. In some cases, it may need to be partially or fully replaced. However, efficient drying techniques, including the use of air movers and dehumidifiers, can often salvage drywall if addressed promptly.

3. Carpet and Flooring:

Water-damaged carpets and flooring require specialized attention. Extraction of water is followed by thorough drying using air movers and dehumidifiers. In some cases, professionals may lift and remove sections of flooring to ensure complete drying of the subfloor.

4. Insulation:

Wet insulation loses its effectiveness and can become a breeding ground for mold. Efficient drying techniques, including the use of dehumidifiers and air circulation, are employed to remove moisture from insulation materials.

Post-Drying Assessments and Restoration

1. Moisture Testing:

After the initial drying process, moisture testing is conducted to ensure that the affected materials have reached an acceptable level of dryness. This involves using moisture meters and other testing equipment to measure moisture content.

2. Structural Integrity Assessment:

A comprehensive assessment of structural integrity is conducted to identify any lingering issues or damage that may have occurred. This assessment guides the restoration process and ensures that the structure is sound before reconstruction begins.

3. Restoration and Repairs:

Once structural drying is complete, restoration and repairs can commence. This may involve replacing damaged materials, repairing structural components, and addressing any cosmetic issues caused by the water damage.

4. Preventing Future Water Damage:

As part of the post-drying process, professionals may provide recommendations for preventing future water damage. This can include suggestions for maintenance, upgrades to building systems, and strategies to address potential vulnerabilities.

DIY vs. Professional Structural Drying

While there are some DIY techniques for addressing minor water damage, professional structural drying is highly recommended for significant incidents. Professionals have the expertise, specialized equipment, and resources to ensure thorough and efficient water removal. Additionally, DIY efforts may fall short in addressing hidden moisture pockets or preventing secondary issues such as mold growth.

Structural drying is a critical component of water damage restoration, requiring a strategic and comprehensive approach. Swift action, advanced techniques, and specialized equipment are essential for efficient water removal. By understanding the principles of structural drying and recognizing the importance of rapid response, property owners can minimize the impact of water damage and restore their spaces to a dry, safe, and healthy condition. Professional restoration services play a key role in guiding this process, ensuring that each step is executed with precision and expertise. Remember, when it comes to water damage, time is of the essence, and a proactive approach to structural drying can make a significant difference in the overall outcome.


Is a Musty Smell a Sign of Water Damage? Featured Image

Is a Musty Smell a Sign of Water Damage?

Musty Smell in Your Home?

That smell in your garage, basement, bathroom, kitchen, or room could be water damage.

We’ve all experienced it before. You walk into a person’s home, cabin, garage, or store and are immediately hit with that musty or wet smell. Don’t let your home be the one people think smells like that!

This musty smell is usually caused by past water damage that has gotten into the walls, floors, or other areas of a building. And although it may not always be detectable by a human nose, this water damage can have very negative impacts on the building it’s in.

Water damage can result in mold or mildew growth within the walls of a home or building. Certain kinds of molds can make your visitors and family feel like they have a cold, with symptoms including watery eyes, sore throat, coughing, and sneezing.

If you smell that musty smell in your home, or if your loved ones are experiencing a cold that just does seem to go away, you might have water damage in your home.

Possible sources of this water damage could be the following:

  • Pipe leak
  • Rain or snowstorm
  • Sprinklers from fire
  • Toilet leak
  • Gutter leak

Contact Frontier Services Group today if you think you may have water damage or mold in your home or building. Our experts can quickly examine the area and help provide the best process for you and your family to make your spaces safe and livable again.

Safeguarding Your Home: Water Damage Prevention During Renovations Featured Image

Safeguarding Your Home: Water Damage Prevention During Renovations

Embarking on a home renovation project is an exciting endeavor that can enhance the comfort, functionality, and aesthetics of your living space. However, amidst the excitement of transforming your home, it’s crucial to prioritize water damage prevention to avoid potentially costly and disruptive issues down the line. In this blog post, we’ll explore the best practices for preventing water damage during home renovations, from proactive planning and preparation to vigilant monitoring and maintenance.

1. Conduct a Thorough Inspection

Before starting any renovation work, conduct a comprehensive inspection of your home to identify potential areas of vulnerability to water damage. Pay attention to areas such as the roof, plumbing fixtures, windows, doors, and foundation for signs of leaks, moisture intrusion, or structural weaknesses. Addressing any existing issues before beginning renovations can help prevent further damage and ensure a solid foundation for your project.

2. Plan for Proper Drainage

Effective drainage is critical for preventing water damage, especially during renovations that involve exterior modifications or landscaping changes. Ensure that your property has adequate drainage systems in place, including gutters, downspouts, and grading to direct water away from the foundation and vulnerable areas of the home. Consider installing French drains or catch basins as needed to manage excess water and minimize the risk of flooding.

3. Protect Interior Spaces

During renovations, take steps to protect interior spaces from potential water damage caused by construction activities. Cover floors, furniture, and belongings with waterproof tarps or plastic sheeting to shield them from dust, debris, and accidental spills. Seal off work areas with barriers or temporary walls to contain dust and moisture and minimize the spread of contaminants throughout the home.

4. Invest in Quality Materials and Workmanship

When undertaking renovations, prioritize quality materials and workmanship to minimize the risk of water damage in the long term. Choose moisture-resistant building materials such as waterproof drywall, mold-resistant paint, and vinyl flooring for areas prone to water exposure, such as bathrooms, kitchens, and basements. Hire licensed contractors with experience in water damage prevention techniques to ensure that renovations are completed to the highest standards of craftsmanship and durability.

5. Be Proactive with Plumbing

Plumbing systems are susceptible to leaks and failures, especially during renovations that involve alterations to pipes, fixtures, or appliances. Be proactive with plumbing maintenance and inspections before, during, and after renovations to detect and address potential issues early on. Replace worn-out plumbing components, upgrade to leak-resistant materials, and install shut-off valves or water leak detection devices for added protection against water damage.

6. Monitor Moisture Levels

Throughout the renovation process, monitor moisture levels in the home to detect any signs of water intrusion or excessive humidity. Use moisture meters or hygrometers to measure moisture levels in walls, floors, and ceilings, especially in areas undergoing renovation or exposed to water sources. Address any abnormal moisture readings promptly to prevent mold growth, rot, or structural damage.

7. Maintain Exterior Protection

Exterior elements of your home, such as the roof, siding, and windows, play a crucial role in protecting against water intrusion and damage. Prioritize regular maintenance and inspections of these components to ensure they remain in good condition and effectively repel water. Replace damaged or deteriorated roofing materials, seal gaps and cracks in siding, and repair or replace faulty windows and doors to maintain a watertight envelope around your home.

8. Allow for Proper Drying Time

After completing renovations, allow sufficient time for materials to dry thoroughly before closing up walls or applying finishes. Proper drying is essential for preventing moisture buildup, mold growth, and long-term water damage. Use fans, dehumidifiers, and ventilation systems to promote air circulation and expedite the drying process, especially in areas with limited airflow or high humidity levels.

In conclusion, water damage prevention is a critical consideration during home renovations to protect your investment and ensure the long-term integrity of your property. By implementing proactive planning and preparation strategies, investing in quality materials and workmanship, and remaining vigilant throughout the renovation process, you can minimize the risk of water damage and enjoy a safe, comfortable, and resilient home for years to come. Prioritize water damage prevention in your renovation projects to safeguard your home and preserve its value for future generations to enjoy.